Thursday, June 30, 2011

JUNE 2011 - HARVEST TALLY & PROJECT LIST UPDATED

Boy, what a month! Both, the plants and us have been pretty productive. We are very happy with how much we have harvested in this our very first June, or I should say in our fourth month of our homesteadying adventure!

When looking at these numbers, bare in mind that all these fruit trees are about or less than four years of age and that I raised all the veggies from seeds and - obviously - did not know yet quite when to plant what in SoCal. I am planning on being much more intime with the planting schedule for our region (now that I know the times of the season out here a tad better) for the next year to turn out more produce.

Anywho, given all the obstacles (off-timing, inexperienced us, aphids, spider mites, cabbage catterpillars, leaf miners, heat wave, hungry featherheads, etc..), I am pretty happy with our harvest for this June.

June 2011 Harvest Tally:
1/2 lbs of mulberries (soo bummed that the season is over; they are too good!)
2 lbs of strawberries (bit by bit or I should say berry by berry from plant to mouth they went - this variety is just too good)
1/2 lbs of Arugula (it's a race: who is faster me or the snails?!)
4 lbs of salads (now we are waiting for the next batch to get ready!)
4 lbs of mustard leaves (gotta admit; mostly bird food)
6 lbs of chard (bummer - the birds got the best of it, the featherheads were simply faster than me)
40 lbs of zucchinis (everyone got to benefit: Aunt Diana, as well as old and new neighbors, even Roberto's patients got to enjoy them...)
6 lbs of savoy cabbage (Oh my...)
1 lbs of peaches (we have donut and white peaches - suhweet!)
1 lbs of red onions with shallots
5 lbs red cabbage
1 lbs of cucumbers (from seeds from Germany! Thanks Andrea, Gabi und Opa!)
1 lbs basil (and yes, I will make pesto verde!)
And 5 lbs of lavender flowers, which I am in the process of turning into essential oils, soaps and sachets.

A WHOOPING TOTAL OF 77 LBS OF PRODUCE!


Duck house left and chicken coop on the right.
 As far as our project list goes, we were not too lazy either, here are the leftovers from our super large project list:
  • Build Chicken Coop (done - check it out.... it is a gorgeous Spanish mansion with a stunning stained glass window, a separate door for the eggs and all)
  • Build Animal Enclosure (almost done)
I guess we need more projects.

So, we came up with a couple more planting beds, since we have a lot of concrete on our property and so many more seedlings that want to be planted.

I am also planning to put the blueberries in one of them since their soil requirements are so much more acidic than our soil, which is more on the alkaline side and their growth has been stunted for a while now.

I am planning on redesigning the front yard, tearing out more lawn as well as moving some of our perennials around.

What else??? Well, the tomatoes are getting ready.... yumm!!! I heavy-pruned them yesterday and staked them.

The featherheads have already eaten almost all of the Swiss Chard. . . good for them!

And I am expecting our very first duck egg some time in the end of July or at the beginning of August. I am sure, when that happens, we will do the happy dance for the featherheads...  Roberto says, he hopes our handicapped Big lays the first egg!

The bees have just gotten a new deep super. If they fill this one up again, Roberto wants to let them swarm! That's right: We are going to give back one if her 'lost children' to Mother Nature.

"Nature never says one thing and wisdom another." Decimus Junius Juvenalis

Tuesday, June 28, 2011

Busy Bees - Super-Installation, Hive Management and Heat-Protection

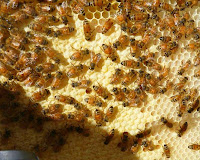
The yellow capped cells hold the next
generation and the darker spots honey
BUSY BEES
On Monday evening, I walked past the hive and noticed that a bunch of bees were sitting outside the hive at the entrance.

They were not all drones, who - like all men, sometimes get kicked out by the ladies for certain too manly behaviours. But there were also females, so, that was not the reason for the lingering at the entrance.

Were they OK?

Noone looked sicklish to me. I didn't see any varroe dots or ill behaviour, but then again, my bee-knowledge is still very limited.

After observing them for a while, I figured they may be either too hot or too crowded.

Considering that it had already cooled off somewhat from the day's heat (around 90F), I was betting on overcrowded. Sure enough, after opening the top cover, it was confirmed: Our bees had reproduced in such a rate that they needed more space.

Oh crap! Why do I ALWAYS discover this when the LA Honey Company is already closed, and we have no extra supers on hand.

On Tuesday morning - after dealing what felt like FOREVAH with Sprint to figure out how to repair my cell phone (they cannot because it will need replacement!), I finally was able to get to one of my favourite stores:

Los Angeles Honey Company in the heart of Los Angeles (1559 Fishburn, LA). While the drive is somewhat long and gnarly, I just LOVE being there. The place is a rather unspectacular warehouse in the metal recycling part of town but it is the people who makes this place so special.

Let me tell you: Folks there are just wonderful, always patient with my new-bee questions and super-knowledgeable (pun intended!).

 New bee home with filled up hive body on bottom,
one empty unpainted deep super in the middle
and a filled up medium super on top.
After explaining my problem and asking for two medium supers with ten frames including wired foundation, they suggested I should get one deep and one medium super as opposed to two mediums.

The owner explains to me that under very rare and good conditions (rain, nectar flow) in a wild sage area (like ours!), a hive can fill a deep super within one week. While I want them to be productive, I don't want to make another trip to Downtown LA next week to buy yet another super. OK, I take the deep and the medium.

Normally we assemble ourselves but this time I grabbed everything fully assembled because I need to provide new housing immediately: There is simply no time to wait for Roberto to come home and build this after work. I also got the extra medium super because I want to be prepared next time; if my ladies keep up this pace, they will fill this deep one in no time. Paid about $100 including tax.

Typically, I aim at the medium supers because I am not quite sure if I can lift a fully-honey-loaded deep super, which can weigh around 60 lbs. But HEY, who is to say I need to lift the whole thing at once? They advised I should take out frame by frame and that way I should be able to handle it. Good point!

Since the ladies need their home-addition immediately, should I forego the exterior painting? Yep, just put the super up. Alright then.

As I said, they are patient with me new-bee. Thanks again!

After one hour in beloved LA traffic (thank goodness for my car's MPG's being between 40 and 50!), I came home to this: a super-happy dog greeting me and two chickens (Black and Splash) in the kitchen including bird-poo on the travertine floor. I guess you can imagine, so I spare you the photos.

BUT HOW DID THEY GET IN? I am positive, I had closed the kitchen sliding door. Suddenly I remembered that Ms Smart-Paw had recently figured out how to open said sliding door. One look at my guilt ridden dog confirms my conclusion. So I shooshed out the featherheads, picked up poo, vaccumed and mopped the floor. So not what I wanted or needed! What I wanted was a massage and what I needed was 20 laps in the pool!

When I finally get to my bees a huge swarm greets me. WHOW! A quick look into all the surrounding trees: no, they are all going into the hive. So, they are not swarming; they are just a large colony.

SUPER INSTALLATION
I was advised to 'under-super' the hive, which basically means that I put the new deep super above the hive body but below the super that we installed a few weeks ago. This way the bees don't have to travel too far to get to the new room.

A quick check on the moon... perfect, it had just moved into gemini, which is an air-sign. All hive-work is best done with moon in an air-sign. Afterwards the colony will improve its brood-tending as well as honey-production after having been worked on an air-day.

I never use the smoker. Partially because I can never get this thing to smoke decently but I also don't see the point. Working the hive on an air-day, the bees are most docile, so I don't need to use it. I get the occasional bee on my hand but the majority remains on the frames.

HIVE MANAGEMENT
While at the hive, I also did some colony-management, i.e. I moved some of the outer frames one frame more towards the center so that the bees may work the frames more evenly. Checked a majority of the frames to see what was going on. Didn't find anything suspicious looking - GOOD!

Found a couple of swarming cells, which I scraped off. They typically form at the bottom of the frame and contain a potentially new queen, with whom after her emergence half your colony will take off with, which is rather undesirable. My bee expert friends at LA Honey Co. had previously advised me to scrape them off and so that is what I did.

Didn't see her majesty but since there are a lot of brood-cells, I am assuming she is doing just fine.

Hive shading - at this point
still with one medium super
HEAT PROTECTION
We installed this hive shade last week when temperatures started to rise. Our hive is located on the north side and therefore somewhat protected from the sun.

However, the sun moves and in the late afternoon, the hive gets a lot of sun.

Bees should be able to tolerate 90F and even 100F but when it gets to 110F, they sure can use some help.

I could just picture how the wax melted under their little wings and it didn't seem too pretty a sight, so I begged my man to create a shield to protect them. And he did. Thanks, BELLO!

After it was installed I realised that it disrupted their flight pattern and so I  kept observing them but apparently they are fine and if it really gets boiling hot out here, they will be in a much better place.


http://www.queenofthesun.com/

"Nature never says one thing and wisdom another." Decimus Junius Juvenalis

Monday, June 27, 2011

Vertical Gardening - Cheap & Pretty Trellising

Man, it's a jungle out there! Our plants have taken off. Unfortunately - some of them - not off the ground.

 
And this causes problems for some of them since they are viny (cantaloupe, cucumber, pumpkin), who need to be lifted higher and higher to produce good fruit. Obviously our growing space is also limited on our 8,000 square feet lot and so vertical gardening is simply a necessity in order to be most efficient.

 
LA Green Grounds activist and master gardener, Florence Nishida (http://www.lagreengrounds.org/), had shown me the kind of trellising system she has been using at Los Angeles' National History Museum and not only were they pretty stylish, they were also completely doable and inexpensive.   And I am off to the next Do It Centre!

 
To make three trellises, I got:

  • 5 electric conduit EMT 1/2 inch 10 feet
  • 6 rebars 4 feet long 1/2 inch
  • 6 conduit connector 1/2 inch elbows
  • a roll of nylon thread
  • a 100 pack of cable binders

Here is what I did:

I cut the EMT's each at 5 feet, using a hacksaw.


Then I drove the rebars into the ground and put the conduits around it.
 
With two conduit posts in the ground, I used the connectors to connect the posts with the third conduit across.
 
Then with 8 inches apart I tied cable binders on each of the three conduits.
 
Finally, I wove the nylon thread around, creating a net.
 
And I am done! Now, grow you peas!
 
 
"Nature never says one thing and wisdom another." Decimus Junius Juvenalis

Victory Gardens and a Greener Future - Not for Los Angeles

It is happening. All over the state, people are tearing out their water sucking lawns and replace them with edibles.

The City of Santa Monica gives residents "Cash for Grass" if they get rid of their lawns, sponsors workshops, and residents can even win a complete landscaping make-over; check out http://www.sustainableworks.blogspot.com/ for more information.

Inspired by the current on-going recession, increasing food prices, poor nutrition in store-bought produce, genetically modified foods everywhere and not to forget a longing to be more in touch with nature has brought many people to bring out the shovels and dig in. Mother Earth that is.

Obviously not everyone is a master gardener and people are looking for help and support. In Los Angeles is a fabulous group called LA Green Grounds, who since November 2010 put in a garden a month for a resident somewhere in South LA. Where there was lawn or dirt before, there will be a planted garden after the troops leave.

Check out their website on http://www.lagreengrounds.org/.

Growing your own vegetables in your backyard is nothing new. Back in the beginning of the last century, almost every household grew their own produce in so-called 'victory gardens'. Born out of necessity due to the limited food supply during the war in the US, UK, Canada and Germany, these gardens soon became a civil morale booster, making the gardener independent from food supply limitations while at the same time rewarding him / her with amazing produce.

Just like then it is today: Ask people who are raising their own produce and they will eagerly tell you all about their adventures in gardening, how their garden created community, they will invite you to take a look at their garden and most likely share some of their produce with you. Do they feel empowered and rewarded for the work they put in? You bet!

While citizens everywhere applaude this grass roots revolution and the City of Santa Monica even promoting a lawn-less gardening approach with numerous financial aid programs and workshops, the city of Los Angeles holds on to the water-suckers.

Ron in South Los Angeles has been cited by the city for the transformation of his parkway into a garden as being "non-compliant". 

The City guidelines for parkways (that strip between the sidewalk and the street in front of your house) say that you must have "turf" (lawn grass) or "turf-like" planting, i.e., nothing over 3-4" high.  I guess they're afraid that someone may lurk behind the rosemary or trip over the cabbages.  If a person wants to plant something other, (s)he must submit a plan, with a fee of course, beginning at $400!  For something more elaborate, the fee begins at $4,000.
Says Florence Nishida, master gardener and activist with LA Green Grounds, "We have asked for a meeting with the district Councilman, but he is always "in a meeting" and his deputy asked for photos, but since then has not responded."

Bear in mind that most of the vegetables are so-called annuals, lasting only for about four months and then are being replaced.

So, I am wondering whether Ron would need to submit new plans for every season?

This citation for creating a garden, that people in the neighborhood love, is in particular sad because Mayor Villaraignosa has announced plans for a more green and sustainable Los Angeles.

And while neighbor Santa Monica hopped onto the green bus and walks the walk in becoming a leader in sustainability, Los Angeles seems to be merely talking the talk.


"Nature never says one thing and wisdom another." Decimus Junius Juvenalis

Sunday, June 26, 2011

What to do with all the zucchini abundance ? Zucchini Recipes

With the zucchini season in full swing, I thought I share some of my favourite zucchini dishes.


Ratatouille
It is a french peasant stew and can be either a wonderful side or eaten with bread or boiled potatoes even a wonderful meal.
I think this is a good recipe for the solar oven because it really is a 'set it and forget it' kinda meal.

1 onion, chopped and
1 garlic clove, chopped heated up in
olive oil

When onion turns glassy-looking, add
1 eggplant, cut in small pieces
1 bell pepper, cut in small pieces
2 zucchini, cut in small pieces
4 tomatoes, halfed

Add salt & pepper and
Toss in 1 bay leave and let simmer

DONE.


Chopska - Salad
Great with anything barbequed!

Lots of feta cheese, cut in small squares
1 onion
2 zucchini
2 tomatoes
1 bell pepper
1 glove of garlic, chopped (optional)

It's really a cut and toss with balsamic vinegar and generous olive oil ans well as pepper & salt.


Zucchini Bread

3 eggs beat with
2 cups of brown sugar and
1 cup of butter (= two sticks)

3 cups of flour
1 teaspoon salt
1 teaspoon baking soda
1 teaspoon baking powder
3 teaspoons cinnamon
3 teaspoons vanilla extract

Blend well, then add
2 cups small chopped zucchini and
1 cup chopped walnuts

You can even  throw some chocolate morsels in.

Bake at 325F for 40-60 minutes in a 4x8 pan; for muffins bake it for 20 minutes.


So, what's your favourite zucchini recipe?


"Nature never says one thing and wisdom another." Decimus Junius Juvenalis

Saturday, June 18, 2011

Propagation of Bulbs

By purchassing our property we 'inherited' a bunch of lillies and paperwhites. They flowered nicely in spring. Now we are kinda back to our original standard to anything planted on our property: If you are not edible or otherwisely benefitial, you are probably not going to last long here.

Today when I trimmed the completely overgrown pollinator-attranctant salvias, I discovered a bunch of paperwhite bulbs and other tubers; I am guessing yellow lillies, since I keep running into them all over the property. Someone really must have been digging these. Roberto put them on the 'MUST-GO, NOW!'-list; he really doesn't care for them and I kinda don't feel them either: no scent, not pretty, not edible, not benefitial to butterflies or pollinators, actually attract snails (maybe I should keep them as food-supply for the ducks?!) and not to forget they are water-suckers.

The paperwhite bulbs had produced offspring and were quite high in numbers, the tubers were only a few but nonetheless looked like they had been in the soil for quite a while.

Bulbs (tulips, hyacinths, amarillis, paperwhites, daffodils, narcisses) are raised either from seed or from bulb. Note: The bulb is not a seed; it is rather part of the root system.

If you raise them from seed , as is true for almost anything in our modern times (when everything is hybridised to the n-th degree for certain features) , unless it is an heirloom (which basically means the original genetic code is intact) - the plant grown will have little to no resemblance of the parent plant. Therefore, it is recommendable to - unless you know what you are doing with crossing plants - not get involved with seeds for these kinda plants. Typically only highly trained horticulturist are involved with this, trying to create a new species or keeping the original ones.

And there is such a easy way to get more bulb-plants: Many species of bulb-grown plants develop numerous bulblets as their offspring. You simply dig them up, carefully divide them: Et voila: the next generation, true to the parent. This may take a season or two. So, in our modern times when instant gratification is the standard, this may not be a good route.

However, in Holland where they know a thing or two about bulbs, they cut the bulbs to create offspring faster!

It is called BULB CUTTING, and here is how you can do this:

Take a mature bulb, quarter it lengthways with a sharp knife (again, thanks JP for the Wuesthofs!).

Then cut each quarter lengthways into two or more wedges, each including a portion of the basal plate of the bulb.

You can further divide these wedges by sliding a knife down between each thrid or fourth pair of the concentric sale-rings of which the bulb is formed and cutting through the basal plate at the bottom.

These fractions are called bulb cuttings. Each should consist of segments of three of four scales attached to a small piece of basal plate.

The bulb cuttings can be planted vertically in a mix of peatmoss and sand with their tips peeking out.

It is recommended to keep them moist and in a temperature that is a bit warmer than what is normally required for this specific species. 

Within a few months at the most, some plump new bulbs will have formed from the basal plate portion and will be starting to develop roots. 

I have done this with the amaryllis, which I like and had only two mature bulbs, while I divided the paperwhites only quarterly each.

Normally, we would not tolerate these bulbs on the property since they are not edible but somehow I got into the whole gardening experimentation.

Preferably this whole digging up and cutting is done in fall when you can also dig them up to store them. Ah well....

Let's see what will grow out of these bulb cuttings.


"Nature never says one thing and wisdom another." Decimus Junius Juvenalis

Thursday, June 9, 2011

Aah, all organic lavender ...


One of my bouquets
We have a few all organic lavender bushes, that do not really deserve to be named 'bushes' anymore; they are more like the size of Kansas!

Well, not really, but you get the idea.

Since it is harvesting season for these wonderful flowers, I was waiting patiently for the moon to move into an air sign, for best flower drying results.

Today in the afternoon, after 4pm to be precise, moon moved into libra, an air-sign.

Armed with scissors and thread (to tie the bouquets with) I went to work.

Now every room has a huge bundle of lavender hung up to dry and the scents is amazingly aromatherapeutic.

We will sleep soo well. And you cannot even see that these so-called bushes got a trimming of at least 5 lbs. Guess, I will do some more cutting.

Of course now I need to figure out what to do with this abundant beauty.

I am already thinking of making sleeping sachets from the dried flowers.

If I get all ambitious and adventurous, I may try making lavender soap.

So, if you have any further ideas and recipes, please send them my way...


"Nature never says one thing and wisdom another." Decimus Junius Juvenalis

Have: Slope, pool and stones. Want: Stairs, flowers and curb-appeal

Our ducks Lotta and Big with Aurelia
Our Campbell Khaki ducks, Lotta and Big, have a beautiful spanish duck-mansion with an adjacent splashy pool which they just love.

However, I felt that their landscaping could use some upgrading while at the same time we needed some stairs to be able to get to the flower beds above the pond.

What I had to work with was a pretty steep slope, lots of these stones and obviously the pond.

What I wanted was stairs, some edible plants or flowers and a tad more 'pretty' overall.

Here is what I did:

With a pick, I created stairs and layed the stones so one can step upon; took all morning.

To ensure the stairs will hold up and the slope won't mud-slide back down, I figured it might be a good idea to plant some sort of a ground cover, as to create some sort of a root-web that holds everything in place.

So, I went to the Do-It-Centre.

What I was looking for was something drought-resistant, edible (for humans), harmless to ducks and chickens and a perennial (no re-seeding or re-planting!). I somehow already had creeping thyme in mind but was open to other suggestions.

Unfortunately the gardener was not too knowledgeable about ground covers and the lady at the cashiers desk even commented on that. She then suggested going to Armstrongs down the street. Love when people are actually helpful as opposed to pushing you to buy their stuff that won't work and therefore won't make you happy.

"Get what you want!", as Roberto always says.

Off to Armstrongs Nursery.

These folks really know what they are doing. Got great assistance and YES: Creeping thyme is the way to go; don't you love when your gut is leading you!?

It is a perennial, a very aromatic herb that I can use in the kitchen, it's a pollinator attractor (pretty little pinkish flowers) and should not harm anyone.

So I got a flat of creeping thyme (ground covers are typically sold in flats) and then back at home I planted it. BTW: After the drive home, my car smells nice now!

Cute sleepy duckie
To plant from out of a flat is kinda weired, because you simply pull the poor plant-thing in pieces. Yes, you may lose some roots! I made mainly triangular or odd shapes.

Water on. Done.

It is advisable to - while waiting for them to get established -water them more often. Once they have taken, they are pretty drought resistant.

Creeping thyme is best planted in the ground; in a container, it is not happy - guess it wants to creep around.

And these ducks are munching it. ARGH! Let's see how long this pretty sight lasts.


"Nature never says one thing and wisdom another." Decimus Junius Juvenalis
Tuesday, June 7, 2011

Harvesting Zucchini and Bee Wax

Since we had left our bees in basically just a super without frames since last Friday night in order to prevent swarming, they have started building natural comb.
A lot.

After we purchased the frames yesterday, we needed to install them.

However, the ladies had already built up quite some wax, which needed to be cut in order to put the more orderly frames with cell foundation in.

I looked at my bees, thinking about what I was going to do: Cutting several chunks of wax from the top of the frames armed with the biggest knife that was in our kitchen's knife block (BTW: THANKS JP!).

Seeing me hesitate, Roberto asked me, "Shall I do it?"

"No. I can do it."

"Just move really fast."

It is pretty wild to attempt cutting wax off from a few frames with hundreds of bees working diligently on the wax. My intuition told me to move really slowly not to acidentally cut someone; or stab I should probably say.

And so I  did. Got a few big pieces of wax out in which some of the cell the girls already had put honey in. Yummy.

I noticed that in the natural comb, the empty cells were outside and the honey in the centre and on the bottom, while in the frames the cannot do that. Then you have honey cells next to brood cells. Thought it was interesting and am wondering whether this actually makes more sense for them to have the kitchen right next to the nursery?!

Then I harvested some zucchinis for dinner. Had Diana over for dinner (thanks for visiting!) and made garlic grilled lamb chops with grilled zucchinis and roasted rosemary potatoes. YUM-YUM!

We have more than twenty plants and at least four different varieties: Yellow Crookneck (the yellow crooked thing on top), Black Beauty (the dark green ones), Summer Squash (the ball on the left) and a hybrid from Germany (lighter green).

"Nature never says one thing and wisdom another." Decimus Junius Juvenalis

Monster Savoy Cabbage

Admittently, we are a tad late for harvesting cabbages but our heads weren't yet the size that we thought of as a head worth chopping. But now it is time for them to be eaten.

Here is our very first harvested savoy cabbage. Savoys (Wirsing) are a kind of cabbage that is rather hard to find in the US and personally I had my seeds brought from my friend Andrea from Germany. THANKS AGAIN!!

They are my favourite cabbage. They are wonderful as a side dish with a apple-roasted pork and mashed potatoes. Guess what is for dinner?!

I had searched for seeds everywhere (in the US) but could not find them. Roberto didn't even know what I was talking about when mentioning these favs of mine. Yes, only a German would have a favourite amongst cabbages. And if you would see my huge cabbage beds (note: plural!) there would be no doubt about where I come from.

To my delight, after I had sauteed the chopped leaves, Roberto loved the savoys as well; there is some German in my man.

Natural Parenting Excursison:
Aurelia currently is in her 'just-the-meat-please'-phase which followed her 'I-looove-brokkoli'-phase, so she fed the cabbage to her 'Babo'.

The famous and amazing Swiss pediatrician Remo H. Largo wrote about an experiment that was done on children in an orphanage. These kids were allowed to eat anything at any point in time that they wanted. These children were given access to all kinds of food; obviously only healthy choices, no candy, chips and such!

After years of this, their overall health, vitamin and mineral levels were checked: Perfectly healthy. Testiment to the fact that children are in tune with their body's needs and will instinctively chose what is right for them. It was also observed that children go through phases with the kinds of food that they eat and then concluded that parents should never use force since this may only lead to eating disorders.

"Nature never says one thing and wisdom another." Decimus Junius Juvenalis

Friday, June 3, 2011

Swarming Queen Bee

I checked on our ladies on Thursday afternoon and what did I find?

Frame after frame with drawn out comb and lots of nicely capped cells.

These girlies sure have been busy!

First the worker bees build a cell and only if Her Royal Highness deems it suitable, she lays an egg into it.

After that the worker bees cap the cell and a little larvae starts growing. Eventually a pupae emerges that then turns into an adult bee at the age of 21 days.

So, I was pretty happy to see that the next generation is in the making since the worker bees only live between one and four months.

But what was this at the botton of this frame?

Regular female bees (the worker bees) go through their larvae and pupa stages in regular sized cells.

Drones (the bigger male bee) usually are 'born' into somewhat bigger cells but are typically  positioned in the center of the frame and somewhat of a peanut shape.

Queen cells are much bigger than regular or drone bee cells. And there are two kinds of queen bee cells.

One kind is called the supersedure queen cell and the other is called the swarming queen cell.

While the supersedure queen only comes into play when the colony decides that the old queen is not capable of doing her job (laying eggs, and ensuring the population) anymore, the bees raise a new queen to replace the old one. These kind of cells are typically placed on the face of the frame.

Then there are the swarming queen cells, which are typically positioned on the bottom of the frame. Under good conditions, the colony may decide to swarm and will raise a virgin queen.

Once she emerges and after mating, one of the queens will take off with half of the team. Obviously, beekeepers are not in love with the idea of losing their work force

So, my bees are getting ready for take off. How can I prevent this?

Ideally, intime a second brood chamber (super) is provided.

OK. It is Friday night if I order online the earliest I can get another super is maybe on Tuesday. Or I can drive to the nearest apiary supply store on Monday. Either way, I may be too late because a queen's larvae through pupa through adulthood is much shorter.

Yes, you guesses it: We rushed to Home Despot, Roberto built an emergency-super and painted it. As soon as the paint is dry, I will add it to the hive. Yes, without frames.

Until I am able to get frames and foundation from the store on Monday, my bees will build natural comb in this emergency super-duper. . .


"Nature never says one thing and wisdom another." Decimus Junius Juvenalis

Wednesday, June 1, 2011

Sowing the seeds - My Starter-Shelf

Living in SoCal is great if you are into gardening: You can basically grow veggies year-round, which is why we constantly keep seeding and planting and seeding and planting.

Being a seed-junky, my sowing got completely out of hand and the seeding-trays where EVERYWHERE with the free-ranging chickens and ducks getting the best of the seedlings. Man, they went to town on these watermelon-babies with the result that I had to get new seeds; not a single seedling left. Our watermelon-lover Aurelia was super upset about this intolerable behaviour.

Then we started stacking the starter-trays on the patio-table. But our chickens can fly. All the way up on the table. Which is why fencing ultimately isn't going to help. Once the plants are bigger, the birds are not so interested anymore. Our chickens are an heirloom breed that is pretty much still a wild bird. They (Splash & Black) fly high and far (saw them fly over me and for over ten yards) and their laying capacity is not very high (100 eggs per bird per year), which is probably why they are a rare breed. I kinda like them; they almost look like a big blackbird. The roo is not a terrible crower, which is why Roberto agreed that 'Black' can stay. YAY!

Back to my seeding: It seemed that the only solution was to fence the starters or bring them back indoors. Indoors semmed savest. But where to put them indoors?

I asked Roberto, whether we could go get a shelf. After some inquisitioning about size and purpose, he declared, he was going to build it for me.

And he did. I love this piece! Love my man!!!!

It has three shelves and each shelf holds four starter-trays. In addition Roberto built a stacking-device for each shelf, doubling capacity, so that I can 'store' up 24 to seeding-trays here. BTW: Each starter-tray holds 48 seedlings.

Needless to say, the shelf is completely full.

What are my seedlings right now?
  • Scarlett Runner Beans (two trays)
  • Mexican Valerian
  • Lettuce (two trays)
  • Arugula
  • Peas (two trays)
  • Cornflowers
  • Edamame (two trays)
  • Buckwheat (four trays)
  • Sweet Corn
  • Pepper (two varieties)
  • Jalapeno
  • Tomatoes (two kinds)
  • Cherry Tomatoes (two kinds)
  • Watermelon
  • Radishes
  • Lupine (Soil-Fixer)
  • Purple Basil
  • Eggplant
  • Birdhouse Gourd (some craft projects for the kiddies)
  • Calendula
  • Carrots (two trays)
  • Amaranth
  • Hyssop
  • Anise

"Nature never says one thing and wisdom another." Decimus Junius Juvenalis