By purchassing our property we 'inherited' a bunch of lillies and paperwhites. They flowered nicely in spring. Now we are kinda back to our original standard to anything planted on our property: If you are not edible or otherwisely benefitial, you are probably not going to last long here.
Today when I trimmed the completely overgrown pollinator-attranctant salvias, I discovered a bunch of paperwhite bulbs and other tubers; I am guessing yellow lillies, since I keep running into them all over the property. Someone really must have been digging these. Roberto put them on the 'MUST-GO, NOW!'-list; he really doesn't care for them and I kinda don't feel them either: no scent, not pretty, not edible, not benefitial to butterflies or pollinators, actually attract snails (maybe I should keep them as food-supply for the ducks?!) and not to forget they are water-suckers.
The paperwhite bulbs had produced offspring and were quite high in numbers, the tubers were only a few but nonetheless looked like they had been in the soil for quite a while.
Bulbs (tulips, hyacinths, amarillis, paperwhites, daffodils, narcisses) are raised either from seed or from bulb. Note: The bulb is not a seed; it is rather part of the root system.
If you raise them from seed , as is true for almost anything in our modern times (when everything is hybridised to the n-th degree for certain features) , unless it is an heirloom (which basically means the original genetic code is intact) - the plant grown will have little to no resemblance of the parent plant. Therefore, it is recommendable to - unless you know what you are doing with crossing plants - not get involved with seeds for these kinda plants. Typically only highly trained horticulturist are involved with this, trying to create a new species or keeping the original ones.
And there is such a easy way to get more bulb-plants: Many species of bulb-grown plants develop numerous bulblets as their offspring. You simply dig them up, carefully divide them: Et voila: the next generation, true to the parent. This may take a season or two. So, in our modern times when instant gratification is the standard, this may not be a good route.
However, in Holland where they know a thing or two about bulbs, they cut the bulbs to create offspring faster!
It is called BULB CUTTING, and here is how you can do this:
Take a mature bulb, quarter it lengthways with a sharp knife (again, thanks JP for the Wuesthofs!).
Then cut each quarter lengthways into two or more wedges, each including a portion of the basal plate of the bulb.
You can further divide these wedges by sliding a knife down between each thrid or fourth pair of the concentric sale-rings of which the bulb is formed and cutting through the basal plate at the bottom.
These fractions are called bulb cuttings. Each should consist of segments of three of four scales attached to a small piece of basal plate.
The bulb cuttings can be planted vertically in a mix of peatmoss and sand with their tips peeking out.
It is recommended to keep them moist and in a temperature that is a bit warmer than what is normally required for this specific species.
Within a few months at the most, some plump new bulbs will have formed from the basal plate portion and will be starting to develop roots.
I have done this with the amaryllis, which I like and had only two mature bulbs, while I divided the paperwhites only quarterly each.
Normally, we would not tolerate these bulbs on the property since they are not edible but somehow I got into the whole gardening experimentation.
Preferably this whole digging up and cutting is done in fall when you can also dig them up to store them. Ah well....
Let's see what will grow out of these bulb cuttings.
"Nature never says one thing and wisdom another." Decimus Junius Juvenalis

Saturday, June 18, 2011

Thursday, June 9, 2011
Aah, all organic lavender ...
We have a few all organic lavender bushes, that do not really deserve to be named 'bushes' anymore; they are more like the size of Kansas!
Well, not really, but you get the idea.
Since it is harvesting season for these wonderful flowers, I was waiting patiently for the moon to move into an air sign, for best flower drying results.
Today in the afternoon, after 4pm to be precise, moon moved into libra, an air-sign.
Armed with scissors and thread (to tie the bouquets with) I went to work.
Now every room has a huge bundle of lavender hung up to dry and the scents is amazingly aromatherapeutic.
We will sleep soo well. And you cannot even see that these so-called bushes got a trimming of at least 5 lbs. Guess, I will do some more cutting.
Of course now I need to figure out what to do with this abundant beauty.
I am already thinking of making sleeping sachets from the dried flowers.
If I get all ambitious and adventurous, I may try making lavender soap.
So, if you have any further ideas and recipes, please send them my way...
"Nature never says one thing and wisdom another." Decimus Junius Juvenalis
 |
| One of my bouquets |
Well, not really, but you get the idea.
Since it is harvesting season for these wonderful flowers, I was waiting patiently for the moon to move into an air sign, for best flower drying results.
Today in the afternoon, after 4pm to be precise, moon moved into libra, an air-sign.
Armed with scissors and thread (to tie the bouquets with) I went to work.
Now every room has a huge bundle of lavender hung up to dry and the scents is amazingly aromatherapeutic.
We will sleep soo well. And you cannot even see that these so-called bushes got a trimming of at least 5 lbs. Guess, I will do some more cutting.
Of course now I need to figure out what to do with this abundant beauty.
I am already thinking of making sleeping sachets from the dried flowers.
If I get all ambitious and adventurous, I may try making lavender soap.
So, if you have any further ideas and recipes, please send them my way...
"Nature never says one thing and wisdom another." Decimus Junius Juvenalis
Have: Slope, pool and stones. Want: Stairs, flowers and curb-appeal
 |
| Our ducks Lotta and Big with Aurelia |
However, I felt that their landscaping could use some upgrading while at the same time we needed some stairs to be able to get to the flower beds above the pond.
What I had to work with was a pretty steep slope, lots of these stones and obviously the pond.
What I wanted was stairs, some edible plants or flowers and a tad more 'pretty' overall.
Here is what I did:
With a pick, I created stairs and layed the stones so one can step upon; took all morning.
To ensure the stairs will hold up and the slope won't mud-slide back down, I figured it might be a good idea to plant some sort of a ground cover, as to create some sort of a root-web that holds everything in place.
So, I went to the Do-It-Centre.
What I was looking for was something drought-resistant, edible (for humans), harmless to ducks and chickens and a perennial (no re-seeding or re-planting!). I somehow already had creeping thyme in mind but was open to other suggestions.
Unfortunately the gardener was not too knowledgeable about ground covers and the lady at the cashiers desk even commented on that. She then suggested going to Armstrongs down the street. Love when people are actually helpful as opposed to pushing you to buy their stuff that won't work and therefore won't make you happy.
"Get what you want!", as Roberto always says.
Off to Armstrongs Nursery.
These folks really know what they are doing. Got great assistance and YES: Creeping thyme is the way to go; don't you love when your gut is leading you!?
It is a perennial, a very aromatic herb that I can use in the kitchen, it's a pollinator attractor (pretty little pinkish flowers) and should not harm anyone.
So I got a flat of creeping thyme (ground covers are typically sold in flats) and then back at home I planted it. BTW: After the drive home, my car smells nice now!
 |
| Cute sleepy duckie |
Water on. Done.
It is advisable to - while waiting for them to get established -water them more often. Once they have taken, they are pretty drought resistant.
Creeping thyme is best planted in the ground; in a container, it is not happy - guess it wants to creep around.
And these ducks are munching it. ARGH! Let's see how long this pretty sight lasts.
"Nature never says one thing and wisdom another." Decimus Junius Juvenalis
Tuesday, June 7, 2011
Harvesting Zucchini and Bee Wax

A lot.
After we purchased the frames yesterday, we needed to install them.
However, the ladies had already built up quite some wax, which needed to be cut in order to put the more orderly frames with cell foundation in.
I looked at my bees, thinking about what I was going to do: Cutting several chunks of wax from the top of the frames armed with the biggest knife that was in our kitchen's knife block (BTW: THANKS JP!).
Seeing me hesitate, Roberto asked me, "Shall I do it?"
"No. I can do it."
"Just move really fast."
It is pretty wild to attempt cutting wax off from a few frames with hundreds of bees working diligently on the wax. My intuition told me to move really slowly not to acidentally cut someone; or stab I should probably say.
And so I did. Got a few big pieces of wax out in which some of the cell the girls already had put honey in. Yummy.
I noticed that in the natural comb, the empty cells were outside and the honey in the centre and on the bottom, while in the frames the cannot do that. Then you have honey cells next to brood cells. Thought it was interesting and am wondering whether this actually makes more sense for them to have the kitchen right next to the nursery?!

We have more than twenty plants and at least four different varieties: Yellow Crookneck (the yellow crooked thing on top), Black Beauty (the dark green ones), Summer Squash (the ball on the left) and a hybrid from Germany (lighter green).
"Nature never says one thing and wisdom another." Decimus Junius Juvenalis
Monster Savoy Cabbage

Here is our very first harvested savoy cabbage. Savoys (Wirsing) are a kind of cabbage that is rather hard to find in the US and personally I had my seeds brought from my friend Andrea from Germany. THANKS AGAIN!!
They are my favourite cabbage. They are wonderful as a side dish with a apple-roasted pork and mashed potatoes. Guess what is for dinner?!
I had searched for seeds everywhere (in the US) but could not find them. Roberto didn't even know what I was talking about when mentioning these favs of mine. Yes, only a German would have a favourite amongst cabbages. And if you would see my huge cabbage beds (note: plural!) there would be no doubt about where I come from.
To my delight, after I had sauteed the chopped leaves, Roberto loved the savoys as well; there is some German in my man.
Natural Parenting Excursison:
Aurelia currently is in her 'just-the-meat-please'-phase which followed her 'I-looove-brokkoli'-phase, so she fed the cabbage to her 'Babo'.
The famous and amazing Swiss pediatrician Remo H. Largo wrote about an experiment that was done on children in an orphanage. These kids were allowed to eat anything at any point in time that they wanted. These children were given access to all kinds of food; obviously only healthy choices, no candy, chips and such!
After years of this, their overall health, vitamin and mineral levels were checked: Perfectly healthy. Testiment to the fact that children are in tune with their body's needs and will instinctively chose what is right for them. It was also observed that children go through phases with the kinds of food that they eat and then concluded that parents should never use force since this may only lead to eating disorders.
"Nature never says one thing and wisdom another." Decimus Junius Juvenalis
Friday, June 3, 2011
Swarming Queen Bee
I checked on our ladies on Thursday afternoon and what did I find?
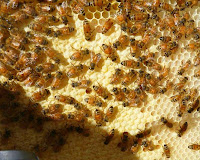 Frame after frame with drawn out comb and lots of nicely capped cells.

 Frame after frame with drawn out comb and lots of nicely capped cells.
 These girlies sure have been busy!
First the worker bees build a cell and only if Her Royal Highness deems it suitable, she lays an egg into it.
After that the worker bees cap the cell and a little larvae starts growing. Eventually a pupae emerges that then turns into an adult bee at the age of 21 days.
So, I was pretty happy to see that the next generation is in the making since the worker bees only live between one and four months.

But what was this at the botton of this frame?
Regular female bees (the worker bees) go through their larvae and pupa stages in regular sized cells.
Drones (the bigger male bee) usually are 'born' into somewhat bigger cells but are typically positioned in the center of the frame and somewhat of a peanut shape.
Queen cells are much bigger than regular or drone bee cells. And there are two kinds of queen bee cells.
One kind is called the supersedure queen cell and the other is called the swarming queen cell.
While the supersedure queen only comes into play when the colony decides that the old queen is not capable of doing her job (laying eggs, and ensuring the population) anymore, the bees raise a new queen to replace the old one. These kind of cells are typically placed on the face of the frame.
Then there are the swarming queen cells, which are typically positioned on the bottom of the frame. Under good conditions, the colony may decide to swarm and will raise a virgin queen.
Once she emerges and after mating, one of the queens will take off with half of the team. Obviously, beekeepers are not in love with the idea of losing their work force
So, my bees are getting ready for take off. How can I prevent this?
Ideally, intime a second brood chamber (super) is provided.
OK. It is Friday night if I order online the earliest I can get another super is maybe on Tuesday. Or I can drive to the nearest apiary supply store on Monday. Either way, I may be too late because a queen's larvae through pupa through adulthood is much shorter.
Yes, you guesses it: We rushed to Home Despot, Roberto built an emergency-super and painted it. As soon as the paint is dry, I will add it to the hive. Yes, without frames.
Until I am able to get frames and foundation from the store on Monday, my bees will build natural comb in this emergency super-duper. . .
"Nature never says one thing and wisdom another." Decimus Junius Juvenalis
Wednesday, June 1, 2011
Sowing the seeds - My Starter-Shelf
Living in SoCal is great if you are into gardening: You can basically grow veggies year-round, which is why we constantly keep seeding and planting and seeding and planting.
Being a seed-junky, my sowing got completely out of hand and the seeding-trays where EVERYWHERE with the free-ranging chickens and ducks getting the best of the seedlings. Man, they went to town on these watermelon-babies with the result that I had to get new seeds; not a single seedling left. Our watermelon-lover Aurelia was super upset about this intolerable behaviour.
Then we started stacking the starter-trays on the patio-table. But our chickens can fly. All the way up on the table. Which is why fencing ultimately isn't going to help. Once the plants are bigger, the birds are not so interested anymore. Our chickens are an heirloom breed that is pretty much still a wild bird. They (Splash & Black) fly high and far (saw them fly over me and for over ten yards) and their laying capacity is not very high (100 eggs per bird per year), which is probably why they are a rare breed. I kinda like them; they almost look like a big blackbird. The roo is not a terrible crower, which is why Roberto agreed that 'Black' can stay. YAY!
Back to my seeding: It seemed that the only solution was to fence the starters or bring them back indoors. Indoors semmed savest. But where to put them indoors?
I asked Roberto, whether we could go get a shelf. After some inquisitioning about size and purpose, he declared, he was going to build it for me.
And he did. I love this piece! Love my man!!!!
 It has three shelves and each shelf holds four starter-trays. In addition Roberto built a stacking-device for each shelf, doubling capacity, so that I can 'store' up 24 to seeding-trays here. BTW: Each starter-tray holds 48 seedlings.
Needless to say, the shelf is completely full.
What are my seedlings right now?
"Nature never says one thing and wisdom another." Decimus Junius Juvenalis
Being a seed-junky, my sowing got completely out of hand and the seeding-trays where EVERYWHERE with the free-ranging chickens and ducks getting the best of the seedlings. Man, they went to town on these watermelon-babies with the result that I had to get new seeds; not a single seedling left. Our watermelon-lover Aurelia was super upset about this intolerable behaviour.
Then we started stacking the starter-trays on the patio-table. But our chickens can fly. All the way up on the table. Which is why fencing ultimately isn't going to help. Once the plants are bigger, the birds are not so interested anymore. Our chickens are an heirloom breed that is pretty much still a wild bird. They (Splash & Black) fly high and far (saw them fly over me and for over ten yards) and their laying capacity is not very high (100 eggs per bird per year), which is probably why they are a rare breed. I kinda like them; they almost look like a big blackbird. The roo is not a terrible crower, which is why Roberto agreed that 'Black' can stay. YAY!
Back to my seeding: It seemed that the only solution was to fence the starters or bring them back indoors. Indoors semmed savest. But where to put them indoors?
I asked Roberto, whether we could go get a shelf. After some inquisitioning about size and purpose, he declared, he was going to build it for me.
And he did. I love this piece! Love my man!!!!

Needless to say, the shelf is completely full.
What are my seedlings right now?
- Scarlett Runner Beans (two trays)
- Mexican Valerian
- Lettuce (two trays)
- Arugula
- Peas (two trays)
- Cornflowers
- Edamame (two trays)
- Buckwheat (four trays)
- Sweet Corn
- Pepper (two varieties)
- Jalapeno
- Tomatoes (two kinds)
- Cherry Tomatoes (two kinds)
- Watermelon
- Radishes
- Lupine (Soil-Fixer)
- Purple Basil
- Eggplant
- Birdhouse Gourd (some craft projects for the kiddies)
- Calendula
- Carrots (two trays)
- Amaranth
- Hyssop
- Anise
"Nature never says one thing and wisdom another." Decimus Junius Juvenalis
Subscribe to:
Posts (Atom)